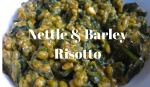
The oldest recorded recipe in Britain according to the Centre for Nutrition and Dietetics at the University of Wales Institute in Cardiff is one for nettle pudding, consisting of not surprisingly nettle with barley. They claim it to be 8,000 years old!
Taking this for inspiration I decided to create a nettle risotto using barley instead of rice, to which I added ramsons (wild garlic), and kelp seaweed.
This nettle risotto recipe is easy, quick and deeply nourishing, so you won’t need bowlfuls to feel thoroughly satiated.
I find barley extremely warming, and with this years spring vacillating between sun, rain and hail, this nettle risotto recipe hits the spot for those who like their food deliciously tasty and simple.
Nettle Risotto Recipe Ingredients
80g nettles
70g wild garlic (chopped)
3g dried kelp
200g pearl barley
500ml stock
200ml nettle & kelp water
40g parmesan cheese
2tbsp cream cheese
1 onion
3 garlic cloves (chopped)
3 tbsp of vegetable oil
black pepper
Nettle Risotto Recipe Instructions
Put nettles and kelp into a pan and cover with water. Bring to a simmer and cook for 10 minutes. Drain, reserving the liquid. Remove the kelp, and squeeze the nettles to remove any excess liquid, then chop.
In a large frying pan or paella dish add 2 tablespoons of oil, and gently fry the onion for about 3 minutes until soft and translucent, next add the garlic and stir so as not to burn it.
Add another tablespoon of oil, then pour in the barley, add the chopped nettles and stir to coat.
Mix together 500ml of stock (I use a good chicken stock) with 200ml of the reserved nettle/kelp liquid, called from now on simply; the stock
Add a ladle of the stock, and stir continuously until it has been absorbed by the barley. Keep ladling the stock in small amounts until the barley is cooked. When you have only about 200ml left of the stock add in the chopped wild garlic. Remember to keep stirring all the time, so the barley doesn’t burn.
When the barley is cooked, add the parmesan cheese, cream cheese and black pepper. Stir together and serve.
Baking soda is not only a key cooking ingredient, it can also be used for cleaning, odor control and for other household uses.
But did you know that baking soda also has a wide variety of outdoor uses? I’m going to show you 10 great uses for this multipurpose product outside your home.
Weed killer: To keep weeds out of sidewalk, paver stone and patio cracks, you can use baking soda. That’s the solution Readers Digest suggests. Simply sprinkle baking soda on your concrete or stones and sweep it into the cracks; the added sodium will chase away the weeds.
Pool water:eHow says you can use baking soda to regulate pH in pool water. For sure, baking soda is a much healthier, natural and chemical-free pH-balancing solution.
Pet stains: If your dog or cat’s urinating is leaving brown stains in your green grass, sprinkle some baking soda in water on the spots as soon as possible after your dog finishes.
Tomato plants:The Gardening Cook uses baking soda to sweeten up tomatoes. You must be careful to not get any on the plant themselves. Sprinkle some baking soda around the base of each plant. The reduction in soil acidity will make your tomatoes much sweeter (but you should test the pH of your soil before).
Garden-safe:Install It Direct says you should sprinkle some baking powder around the perimeter of your garden to keep nibbling rabbits away. Rabbits can literally destroy your garden quickly. In addition I recommend putting a fence around and getting an outside dog.
Patio-safe: Wash off patio furniture using a water-baking soda mix. You can also sprinkle the powder directly onto the furniture and scrub with a damp sponge and the wash it off.
Rugs and mats: You can do the same as above to clean outdoor rugs and mats which begin to get mildewy and smelly after spring rains.
Fire control: Many people love the ambiance of an outdoor fire all year round, even in summer. But sometimes fire pits can get a bit too heated for summertime use; having a squirt bottle filled with water and a couple tablespoons of baking soda will help tame the fire monster.
Ice melt: Baking soda makes a great de-icer for your car, sidewalks and farm equipment. Use it in place of corrosive salt.
Sparkling windows: You can also use a baking soda-and-water combo to clean bugs and other debris off your glass panes and windshields.
Sometimes you end up wishing you had a resource at hand to make it easier to apply Permaculture principles. This was the case for myself when it came time to start thinking about beneficial groupings of plants and those groupings that do not go well together.
This very simple information sheet is easy to use and very handy to have as a reference, either printed out and hung up on the wall or on the computer when we sit down and start thinking about designing our gardens or food systems.
Here is a video showing how to make charcoal from scratch (wood). The uses sharp rocks to chop the wood into small pieces, puts them in a pile, covers it with leaves and kindling, covers the mound with mud, and then burns the wood under it until it becomes charcoal.
Charcoal burns hotter than wood with less smoke. So it’s perfect for cooking or metal working. Enjoy!
Most of the people who are in a survival situation, do not think about hygiene at all. But the main point is that it is really important because if you keep your body clean, you can avoid all the diseases and infections. These ailments can kill you or make your life tough in that situation. Another thing to note here is that making through the survival situation is not that tough as you might think. Importantly, you would be requiring your material used in usual survival activities like grease, ash or animal fat.
Making soap in survival situation
One of the most common way to make a cleaner is to mix wooden ash into grease. This method is really quick and easy to make. The only problem here is that the cleaner which will be formed can be used to clean kitchen utensils, tools etc. and is not suitable to use on human body. So if you want to create homemade soap while using the common material you find in the wilderness, follow the below mentioned steps
1. First you have to start with removing pearl ash (which is a purified version of potash) or potash itself, which are basically different forms of potassium based alkali present in wood material or plants. You can do this by leaching. Next you need to make a container having small holes present in the bottom
2. Form the first layer by placing small gravel. This layer will form at the bottommost part of the container
3. Then above the layer of gravel, place sand or straw. Basically the use of sand or straw is because they function as a filter. Do not worry, if you cannot find them, you can use any kind of filter
4. Now you would have to fill the rest of the container with the ashes. These ashes have to be of a cooled campfire which makes it easy to obtain.
5. Now you have to place a cooking container below the first container so that you catch the runoff.
6. Start now with pouring about a gallon of water onto the ashes. Doing this will allow the brownish-grey water (also called lye) to pass through the hole present at the bottom of the container. Then it will pass on to the second water underneath the first. You should pour slowly, like 2, 3 ounces in a minute. Do note that if the ashes have started to swim, then you should slow down the pace of pouring. During the leaching process, if you notice that lye is losing colour, then you can add more ash too.
7. After this boil the lye water using the cooking container. It should be done until half of the water has been evaporated. The mixture thus formed may froth or foam. Small bubbles will also rise from the sides of the pot. The solution thus formed is called potassium carbonate or potash
8. Now add grease, animal fat and half a cup lard to the boiling mixture and keep cooking for about 30 minutes. Note that if you are using animal fat (which could be the case if you are making soap in the wilderness, and that is the most easily available option) then do ensure that it is free meat, blood or food particles. But if the animal fat is not pure, then it may spoil the soap in the drying process.
9. Now it’s time to place the mixture into molds. Do not worry about the shape of the mold as it does not matter. You can use a deep dish or wooden mold carved from tree wood would also do. Large mold can also be used and once the soap is hardened, cut the bars into pieces.
10. Leave the mixture to dry for 1-2 days. After that remove the soap from the mold.
11. If you have used larger mold, cut it into pieces
12. Now you need to place the soap in a well ventilated area for about 10-14 days. If you have a lot of soap bars, it is better not to stack them up but to lay them which would help in the drying process.
Additional notes to be taken in consideration
Animal fats used in soap making process
You can clean the animal fats used in the soap making with a process called rendering. With this process you can remove all the animal meat tissue which surrounds the animal fat. Add the fats (chopped into small pieces) with cooking grease in a container having a small amount of water. Do not stop boiling the mixture until all the fats and grease is completely melted. Now remove the mixture from boiling and add more water to it. Let the solution cool overnight and the next day you will see all the animal fat solidified at the bottom of the container. That layer would be a clean layer of fat.
Softness and hardness of resulting soap
After the whole soap making process, if the resultant soap is too soft then you can put more salt on top of it. Once you do that, the soap will absorb the water and will harden it, giving it the texture similar to the commercial soaps. Another thing to consider here is that the type of water which you use in the soap making process also determines the end product. If you use rain or spring water, then it would be a best case scenario as they do not contain any acidic chemicals or metallic substance present. You can also use river water but for that you would also require baking soda or salt to harden the soap. Making the soap smell good
You can make your soap smell good by adding natural fragrances to it. For example you can use wintergreen or oil squeezed from lavender which would make the soap smell as the commercial soap. Another substances which can be used are lemon juice or vinegar which can make the soap free of any kind of pungent or undesirable smell Other uses of lye water
You can also use lye water to sanitize latrines and outhouses as it kill the bacteria and it would be quite beneficial when you are in the wilderness.
Marjory WIldcraft travelled to the Copper Canyons of Mexicoe to spend time with the Tarahumara Indians. These Insidans are the fastest ultra marathon runners in the world and part of thier incredible athleticism is because they grow their own food. Watch this video and learn the 3 most common types of corn that they grow.
Yes, you can make your own anti-biotics at home. I’ll show you how to make a really super powerful one (it’s easy to do). Anyone can do it. Most people will want to do this in their backyards or on a patio. But I suppose you could do it indoors too. This one I’ll show you how to make is way more complex than anything the pharmaceutical companies can produce, yet it is simpler and easier to make. No, you won’t need a lab of chemistry set. No, you won’t need microscopes or chemicals. Nope, you won’t even need a spectrum analyzer….
This is so simple it’s just amazing you aren’t doing it right now.
This particular anti-biotic not only helps boost your immune system for any time you have an infection, but it is also good for when you have a cold, it’s known to help lower cholesterol and high blood pressure, it’s been known to help balance blood sugar, fight cancer, fight fungus, and more.
Hate to drag hoses and tired of lugging compost? Check out this super simple system the Tarahumara Indians use to grow apples with almost no work. Learn all these cool techniques for yourself by hopping over to the Home Grown Food Summit with over 30+ presentations from March 7th to 13th, 2016.
You’ve never heard of a squash pit? You might be thinking “but squash have seeds, not pits!”. True, true, but check out this fun video. And head over the the Home Grown Food Summit to see the whole movie.