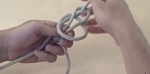
Knot tying has always been a key survival skill. The experienced outdoorsman knows that there are right and wrong knots for certain jobs. A good knot can save lives when your are dealing with a survival situation or performing first aid. So be sure to watch this video and learn these 7 basic knots.
Your best tool in a survival situation is your knowledge.
This 14min video is plenty of fantastic tips that could make you survive in the wilderness. Being aware of what is possible to do in such a hostile environment is essential.
If you want mother nature to cooperate with you instead of working against you, you must watch this short but useful video.
Watch this video until the end because I am sure there are some points that will help you in your life.
In a survival situation, staying hydrated is vital. Sometimes there is no water source close to you like a river or a pond. But there is one thing you will ever find in the wild. Trees!
Trees are very helpful for surviving. They provide wood for fire and shelter but they are also an infinite supply of fresh clean water.
This video will show you how to easily fill your canteen by tapping a tree.
Knifes are one the best survival tools. If you are in a survival situation, you will certainly use materials you have on hands to build your own tools. I’ve compiled some of the best knife making tutorials. Theses guys use only natural or easy to find materials. If you’re able to make your own knife today, you’ll be well prepared in a survival/SHTF scenario.
1. Homemade Knife from a Stone
Very useful video because you will always be able to find some stones to make a survival knife. Even if you are lost in the wild.
2. Homemade Knife from a Saw Blade
You should have a saw in your garage. So it’s easy to make your own knife with this tool.
3. Homemade Knife from Pry Bar
A very tough knife.
4. Stone Knife ”White Tail Dagger”
Making a primitive stone knife made from flint and a whitetail deer antler.
5. Homemade Big Knife from an Old Lawnmower Blade
As you see, we have infinite mechanical parts that can be chnaged into a great knife.
Cast away on a deserted island? Here’s a survival technique for making a fire with the most basic of resources. How to make a fire rubbing 2 sticks together!
In this article, I assume that you have NOTHING to clean your water: no tablets, bleach, water filter, etc,…
Water is essential for human health, in particular in emergency situations.
How is water contaminated?
Leaking septic tank or latrine
Contaminated water surface infiltration of wells and sources
Collecting water with unwashed hands and/or dirty containers
Animals using the same water source
Items that fell into the well
However, even if the water you collected is clean, inappropriate health practice could contaminate it:
transportation from source to home in dirty containers
Keeping water at home in opened and/or dirty containers
Handling water with dirty utensiles or dirty hands
Water can be contaminated after each step!
Here is a checklist to know if water could be contaminated:
Does the water look clean?
Does the area around water seem clean?
Do storage and handling of water are appropriate?
Do the persons have good health practice habits?
If you answer no to one of this question, you should’nt drink that water.
HOME WATER TREATMENT AND SAFE STORAGE
1. Filtering
Filtering water is an important first step. If you do it correctly, it will improve all the different methods presented below. By filtering muddy water (or water that doesn’t look clean) with a thin and clean cotton fabric, you can remove a great part of suspended solids and insect’s larvas.
A simple test to know if the fabric is good is using it to filter water. If impurities don’t go trough it, it’s appropriate. It shouldn’t be transparent or too thick, because it will take more time to filter.
By washing the fabric between each use, you keep your filtering efficient.
Only filtering is not enough for making a contaminated water drinkable, but it facilitates home water treatment.
2. Desinfection
If water is clear but could be contaminated, it should be desinfected.
I am going to detail 2 methods:
Boiling
Solar desinfection
Boiling
Boiling is a traditional way to treat contaminated water. If used correctly, it provides drinkable water when you have no other options.
But boiling water has pros and cons.
PROS
Boiling will kill all pathogenic germs
Boiling is a method easy to do
CONS
You need a kilo (2 lbs) of wood to boil 1 liter (33oz) during 1 min
Your water will not look less cloudy after boiling
Boiling has not a durable effect. If not stored properly, it could be contaminated again. Boiled water should be used in the next few days after boiling.
The temperature of boiling must be high to be efficient. If you only see vapour, it’s not boiled!
You should see big bubbles when boiling.
How much time should you boil water?
Low altitude: 1min with big bubbles
High altitude: 3min with big bubbles
Personal Tip: After boiling, your water will taste bland. Shake the water in a bottle or put a pinch of salt for each liter (33oz). It will taste a lot better!
Solar Desinfection
If you expose water to the sun, it will kill most of germs. This method is more efficient with high temperature.
A simple way for treating water is to expose to the plastic/glass bottles filled with water. Each bottle should stay at least 3 days on direct sun. You should double the time of exposition if there are clouds or if the water is murky.
Personal tip: If you don`t have a bottle, you can use a clean and transparent plastic bag. Use a undulated sheet metal for better efficiency.
Solar desinfection has also pros and cons
PROS
Very easy to do with common items
If exposed enough time to sun, it will kill most of bacterias
CONS
Solar desinfection has not a durable effect, so water could be contaminated again if not stored appropriately
Water should be drunk in the next few days
A slower method than the others and the weather must be sunny
Now, we are going to detail a good method to remove mud from water.
3. Decantation
If your water is muddy, you can let it decant for a few hours. It will separate water from sediments. Filtering it with a piece of fabric as described above will increase the efficiency of this process.
Notice: Decantation is not enough for cleaning water. It must be desinfected to remove pathogenic bacterias. But this process will increase the desinfection’s efficiency.
The 3 Containers Method
This method consists in reducing the quantity of impurities and pathogenic germs by pouring water in a first container, and waiting that the sediments are deposited at the bottom. Then you transfer the water from the first container and after from the second to the third one.
It should be your daily routine when SHTF.
Every day, when you bring water to your house:
Drink water from container 3
Pour slowly water from container 2 to 3
Wash container 2
Pour slowly water from container 1 to 2
Wash container 1
Pour water from your water source (bucket 4) to container 1. It’s better to use a fabric to filter that water before. Let water in containers for a day and repeat the process.
Drink water only from container 3. This container can be washed and sterilised by boiling it regularly.
Personal tip: By using a flexible tube to siphon off water from one container to the other, you reduce sediments blending. You can improve this method by filtering water with a piece of fabric each time you transfer a container to another.
This method is temporary and useful in an emergency situation when you don’t have other option until you can use another method for cleaning water.
In an emergency situation, it’s possible that you won’t have 3 containers. You can use only 2 containers instead of 3 but the efficiency will decrease. The water should stay longer for impurities to be deposited and pathogenic germs to be killed.
The 3 containers method has also pros and cons.
PROS
This method reduces hugely the quantity of bacterias and impurities
It’s very cheap and easy to do. You only need local resources.
CONS
This method doesn’t remove all the pathogenic germs. Desinfection is necessary to avoid any risk of disease.
4. Sand Filter
Sand filtering is a very simple and quick method of pretreating water. It reduces the quantity of impurities and make desinfection more efficient.
Pour water in a container with sand and gravel. Water flows by a tap or a hole to a storage container.
When SHTF, it won’t be long before you run out of food. So you need a short term and a long term strategy, no matter if you live in a city or in the countryside.
Learning the most common edible plants you can find everywhere in your living area could help you survive and stay healthy.
90% of peoplearound us are not able to tell the difference between a turnip and a pea plant. So they’re far away to know that some plants that grow in their backyard are edible.
So the point is if you’re able to access a food that 99% of people are not even aware of its existence, you increase your chance to survive and thrive in the new world that is coming.
Here is the 10 most common wild edible plants you can easily find, harvest and eat.
1. Dandelion
Edible Parts: Roots, leaves and flower
Preparation: Dandelion leaves can be added to a salad or cooked. They can also be dried and stored for the winter or blanched and frozen. Flowers can be made into juice, or added into many recipes. The root can be made into a coffee substitute. The root and leaves can be dried, stored and made into tea.
Preparation: Raw or cooked as a potherb, young leaves before flowering suitable in salads or soups, can be cooked and used like spinach. Dried seed pods and flowers ground into powder used as a flour, young flowers in salads. Cooked root edible. Dried flowers best known for making tea.
Preparation: Young leaves can be eaten raw or cooked. They are somewhat bitter and tedious to prepare because it’s generally preferable (though not required) to remove the fibrous strands before use. Many people blanch the leaves in boiling water before using them in salads in order to make them more tender. Once blanched, plantain can be frozen then used later in a sauté, soup or stew. Seeds can be eaten raw or cooked and can be tedious to harvest. The seed can be ground into a meal and mixed with flour. Dried leaves make a healthy herbal tea.
Preparation: Young leaves are preferable however, no matter how far into the growing season be sure to remember that until dried or cooked, stinging nettle leaves will have those stinging hairs – never eat them raw! Nettles make an excellent spinach substitute and can also be added to soups and stews. Nettle root is used for medicinal purposes including enlarged prostate and when there is difficulty in urination due to BPH. Nettle tea made from the root can help urinary ailments. Tea made from the leaves is rich in iron and can aid coagulation and the formation of hemoglobin.
Preparation: Saponins in the seeds are potentially toxic and should not be consumed in excess. Lamb’s quarters contain some oxalic acid therefore when eating this raw, small quantities are recommended. Cooking removes this acid. Lamb’s quarter can be eaten in salads or added to smoothies and juices. Steaming this edible weed is one method of cooking, or can be added to soups, sautés and much more. Drying this wild edible is one way to add this nutritious plant to your meals throughout the winter or you can blanch and freeze the leaves.
Preparation: First year roots can be eaten raw, or can be slow roasted for many hours making them sweeter. Older first year roots — scrubbed –boiled 20 minutes. Young shoots boiled until tender, more if bitter. Second year, stems peeled before flowering and boiled 20 minutes. Seed sprouts edible. Young leaves boiled edible but bitter. Leaf stems peeled and boiled. Also leaves can be wilted by fire then used for wrapping food
Preparation: The leaves can be added to a salad, the fruit can be a substitute for capers and the flowers can be tossed into a salad. When cooked, the leaves create a mucus very similar to okra and can be used as a thickener to soups and stews. The flavour of the leaves is mild. Dried leaves can be used for tea. Mallow roots release a thick mucus when boiled in water. The thick liquid that is created can be beaten to make a meringue-like substitute for egg whites. Common mallow leaves are rich in vitamins A and C as well as calcium, magnesium, potassium, iron and selenium.
Preparation: Chickweed leaves are used by adding them raw to salads and sandwiches. They can be tossed into soups and stews as well. When adding to a cooked dish, the stems and flowers can be used also.
Preparation: The lower parts of the leaves can be used in a salad; the young stems can be eaten raw or boiled; the young flowers (cattails) can be roasted. Yellow pollen (appears mid-summer) of the cattail can be added to pancakes for added nutrients. Shake the pollen into a paper bag and use it as a thickener in soups and stews or mix it with flour for some great tasting bread. The root can be dried and pounded to make nutritious flour. Young shoots can be prepared like asparagus but requires longer cooking time to make them tender. Added to soup towards the end of cooking, they retain a refreshing crunchiness. They’re superb in stir-fry dishes and excellent in virtually any context.
Preparation: Shepherds purse leaves can be eaten raw or cooked (raw is healthier). Young leaves used before the plant flowers is a tasty addition to salads. The leaves are a cress and cabbage substitute that becomes peppery with age. The leaves are generally available all year round and can be dried for later use. The flowering shoots can be eaten as well. Shepherd’s purse seeds can be used in a salad, but they are so tiny and fiddly you’ll need patience to collect them. The root is also edible; dried and ground up is can be used as a ginger substitute.


